Showing posts with label DHCP server. Show all posts

Tuesday, May 28, 2013

Install and Run DHCP Server on Windows XP / Vista / 7


A DHCP Server assigns IP addresses to client computers. This is very often used in enterprise networks to reduce configuration efforts. All IP addresses of all computers are stored in a database that resides on a server machine.
This is a very simple and easy to use implementation of a DHCP Server for Windows based systems supporting all Windows operating systems from Windows 98 to Windows 7.
The configuration data as well as the client “database” is kept in an INI file.

The DHCP Server runs instantly without any installation as a service or application.


RUNNING THE DHCP SERVER

A DHCP Server is a protocol server for TCP/IP networks that supplies IP addresses to other computers. DHCP Server for Windows also supports TFTP, DNS and HTTP protocol which makes a nice package for easy and simple to install networks e.g. for remote boot and other purposes. DHCP server runs on all Win32 capable Windows operating systems starting from Windows 95 to Windows 7.

Installation

The DHCP Server is a portable application and runs from anywhere on your computer. Extract the content of the zip file wherever you like, e.g. D:\dhcpsrv. You will now find the following files in there:
  • dhcpsrv.exe
  • dhcpwiz.exe
  • readme.txt
  • wwwroot
    • dhcpstyle.xsl
    • dhcppkgstyle.xsl
    • favicon.ico
    • index.html
    • RJ45_5.jpg
    • RJ45_52.jpg

Configuration with dhcpwiz.exe

If you are a first time user of DHCP server then the dhcpwiz.exe program gives you a good head start in setting up the ini file needed to run the DHCP server. The dhcpwiz.exe program is a wizard style configuration program for the DHCP server. It will guide you in 6 easy steps through the basic configuration of the software.

For More details regarding DHCP Installation and Configuration please visit the following link :


For Downloading the DHCP Server files please visit the following link:


DHCP Server assigns IP addresses to multiple clients


Saturday, April 28, 2012

Packet Tracer - Setting up and managing a DHCP server


Introduction


DHCP (Dynamic Host Configuration Protocol) service is a key component of your network infrastructure by allowing centralized ip address management on a single pool of servers. DHCP configuration is also part of CCNA and CCNP Switch certification exams curricula. This skill can be tested in lab environnement during exams ans it's important for students to get used to DHCP configuration before taking the exam.
Packet Tracer 5.3 implements two methods for setting up a DHCP server in your network :
  • Configuration of DHCP pools on Cisco routers or multlayer switches.
  • Configuration of a standalone DHCP server appliance on the network and usage of the "ip helper-address" command on network devices for DHCP traffic forwarding outside each local broadcast domain. This tutorial will describe this method for implementing DHCP service in your network.

Tutorial description


This tutorial will show you how to configure dynamic IP address assignment on multiple VLAN with a unique DHCP server appliance on the network.
Two VLANs are configured on Switch0 with Router0 as default gateway :
  • VLAN 10 - Nework : 192.168.10.0/24 - Gateway : 192.168.10.1 (FA 0/0.10)
  • VLAN 20 - Network : 192.168.20.0/24 - Gateway : 192.168.20.1 (FA 0/0.20)
The unique DHCP server is located on a remote subnet with IP 172.16.24.2.


DHCP configuration

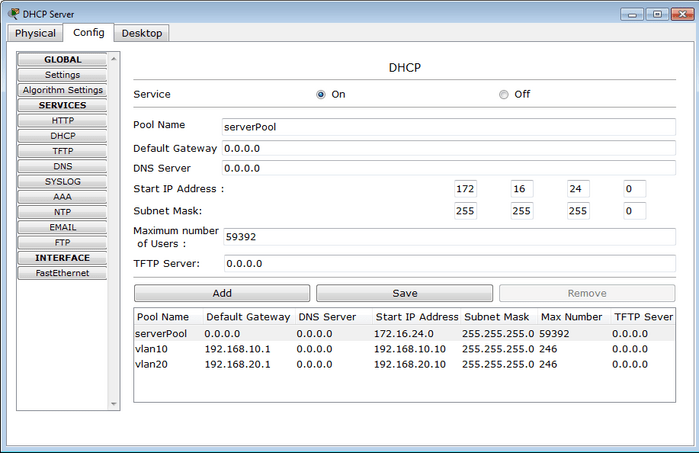
Declare IP address pools on the DHCP management tab of the server like on the picture below. One pool has to be declared for each VLAN. Don't forget to configure the right network settings and default gateway (Router0 FA 0/0.10 and FA 0.0.20 IP address) for each VLAN.

DHCP server configuration on packet tracer 5.3

Configure router0 for DHCP forwarding

Router(config)# interface FastEthernet0/0.10
Router(config-subif)# encapsulation dot1Q 10
Router(config-subif)# ip address 192.168.10.1 255.255.255.0
Router(config-subif)# ip helper-address 172.16.24.2

Router(config)# interface FastEthernet0/0.20
Router(config-subif)# encapsulation dot1Q 20
Router(config-subif)# ip address 192.168.20.1 255.255.255.0
Router(config-subif)# ip helper-address 172.16.24.2

[ Click on Images to Enlarge ]